
| 일 | 월 | 화 | 수 | 목 | 금 | 토 |
|---|---|---|---|---|---|---|
| 1 | 2 | 3 | 4 | 5 | ||
| 6 | 7 | 8 | 9 | 10 | 11 | 12 |
| 13 | 14 | 15 | 16 | 17 | 18 | 19 |
| 20 | 21 | 22 | 23 | 24 | 25 | 26 |
| 27 | 28 | 29 | 30 |
- spring security 인증
- 디자인 패턴
- Transaction isolation level
- Pessimistic Lock
- 스프링 log
- Optimistic Lock
- Redis
- JPA 낙관적락
- JPA 동시성
- spring security
- JPA 비관적락
- 암호화
- 스프링
- annotation
- Android
- spring
- JPA
- 스마일게이트
- Inno DB
- 안드로이드
- 낙관적락 비관적락 차이
- 서버개발캠프
- 개발
- flask
- 서버
- 캠프
- bean
- JPA Lock
- 스프링 로그
- component
- Today
- Total
모르는게 많은 개발자
[스프링] Spring Security 인증은 어떻게 이루어질까? 본문
예전 포스팅에서 security 관련 예제를 다룬적 있다. 당시에는 내부 프로세스를 모르고 예제를 보면서 UserDetails, UserDetailsService, Authentication만 커스텀해서 인증을 다뤘다. 이번 토이프로젝트에서 OAuth로그인을 도입하다 내부프로세스를 세세히 분석해게 되어 까먹기 전에 분석한 내용을 정리하고자 한다.
이 글을 읽을 때 기본적으로 Principal, Authorities, UserDetails, UserDetailsService, Authentication의 개념을 알고 있다는 전제하에 글을 쓴다.
Spring Security는 기본적으로 여러개의 Filter객체들이 순차적으로 수행되는 방식이다. Spring Security는 Filter객체들의 집합체라고도 말할 수 있을 것 같다. 그럼 그 Filter들은 어떤게 있을까? 밑의 이미지는 인프런 백기선 개발자님의 강의에서 가져온 Spring Security의 Filter 목록이다.

그렇다면 이 FIlter을 실행하는 곳은 어디일까?
FIlterChainProxy라는 클래스가 있다. 아래는 FilterChainProxy의 일부이다.
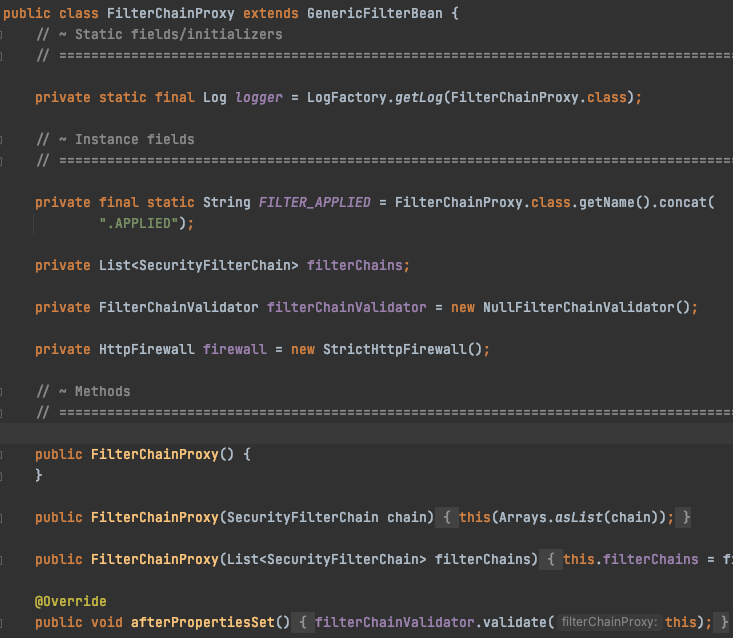
FilterChainProxy에는 getFilters()라는 메소드가 존재한다.
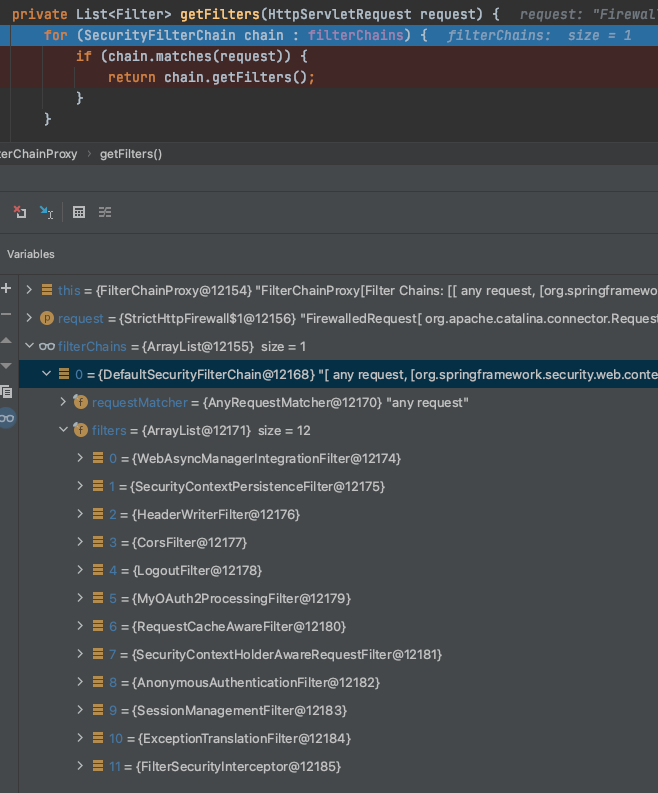
위 사진은 디버깅을 통해 getFilters()를 살펴본 것이다. 디버깅 내용을 보면 filterChains라는 List에는 위에서 본 Spring Security Filter목록들이 들어있는 것을 확인할 수 있다. 중간에 보면 MyOAuth2ProcessingFilter들어있는데 이건 내가 직접 작성한 커스텀 필터이다. 즉, 커스텀한 인증을 만든다는 것은 직접 Filter를 만든다는 것을 의미한다.
혹시 FilterChainProxy는 누가 실행하는지 궁금한 사람들이 있을 수 있는데, FilterChainProxy는 DelegatingFilterProxy라는 서블릿 필터가 실행한다.
우리가 가장 관심있는 부분은 어디인가?
Spring Security가 여러 Filter들로 이루어져있다는 것은 알았다. 하지만 대부분 우리가 제일 관심있는 건 역시 아이디, 비밀번호를 입력했을 때 아이디, 비밀번호를 체크하는 Filter일 것이다. 지금부터 Security의 Default 인증 Filter를 살펴보자.
Spring Security는 기본적으로 세션 쿠키 방식의 인증이 이루어진다. 이 인증이 이루어지는 Filter는 UsernamePasswordAuthenticationFilter 클래스다.

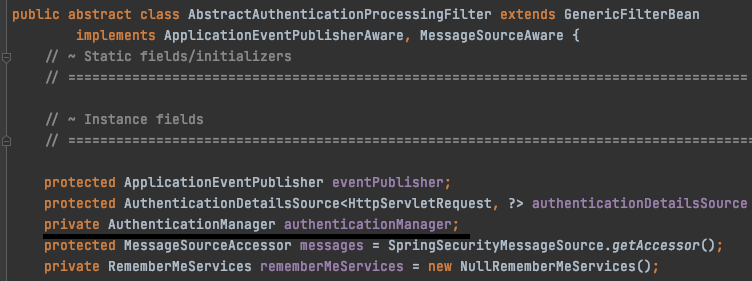
UsernamePasswordAuthenticationFilter는 AbstractAuthenticationProcessingFilter를 상속받고 있다.
AbstractAuthenticationProcessingFilter에서 에는 doFilter()라는 메소드와 attemptAuthentication()이라는 추상메소드가 존재하는데 doFilter()는 FilterChainProxy에서 Filter목록들을 호출할 때 사용하는 메소드이다. 즉, 각 Filter의 로직들은 doFilter()에 담겨있다.
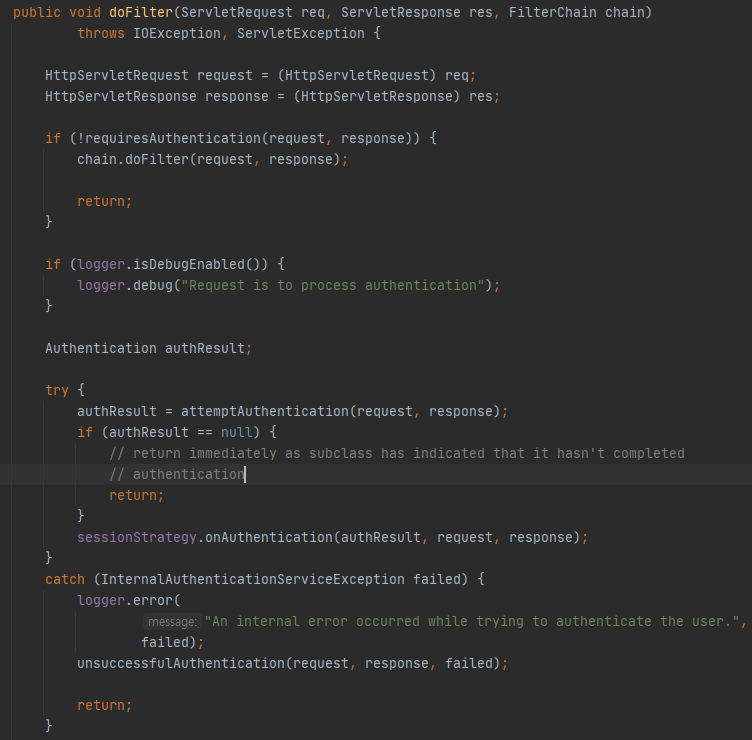

doFilter() 중간에 보면 authResult = attemptAuthentication(request, response);가 있다. 여기서 UsernamePasswordAuthenticationFilter에서 정의된 attemptAuthentication()이 호출 된다.
정의된 attemptAuthentication()은 다음과 같다.
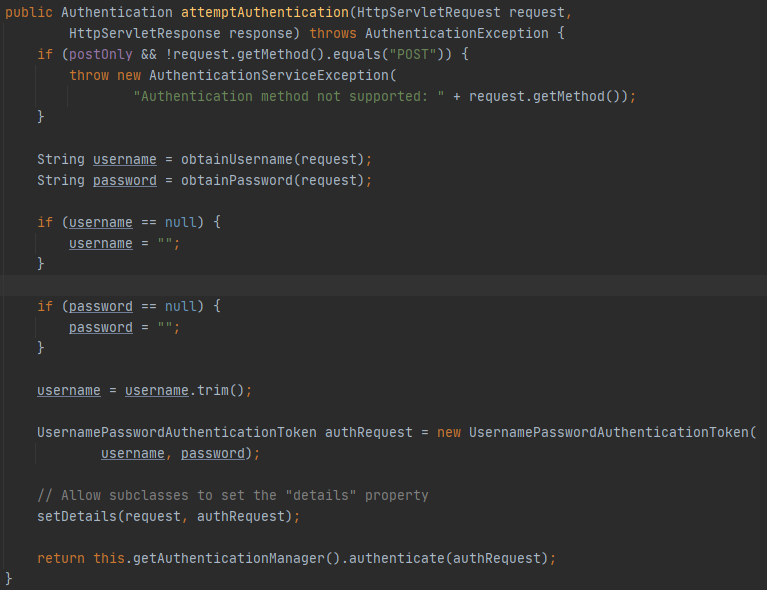
이 코드에서 봐야할 것은 UsernamePasswordAuthenticationToken 클래스와 this.getAuthenticationManager()이다.
UsernamePasswordAuthenticationToken
먼저 UsernamePasswordAuthenticationToke이 무엇인지부터 알아보자. 밑의 사진은 클래스의 일부이다.
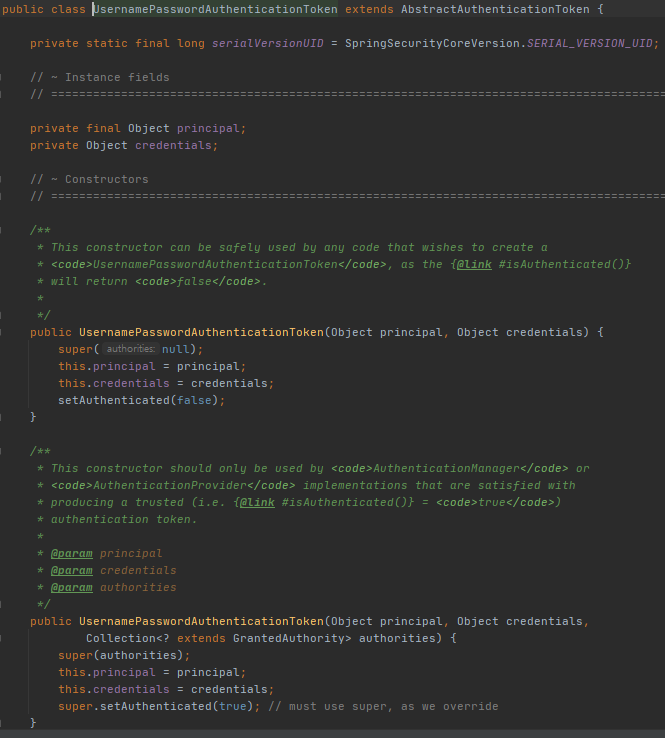
먼저 볼 것은 UsernamePasswordAuthenticationToken은 AbstractAuthenticationToken을 상속 받는다. AbstractAuthenticationToken도 한번 보자.
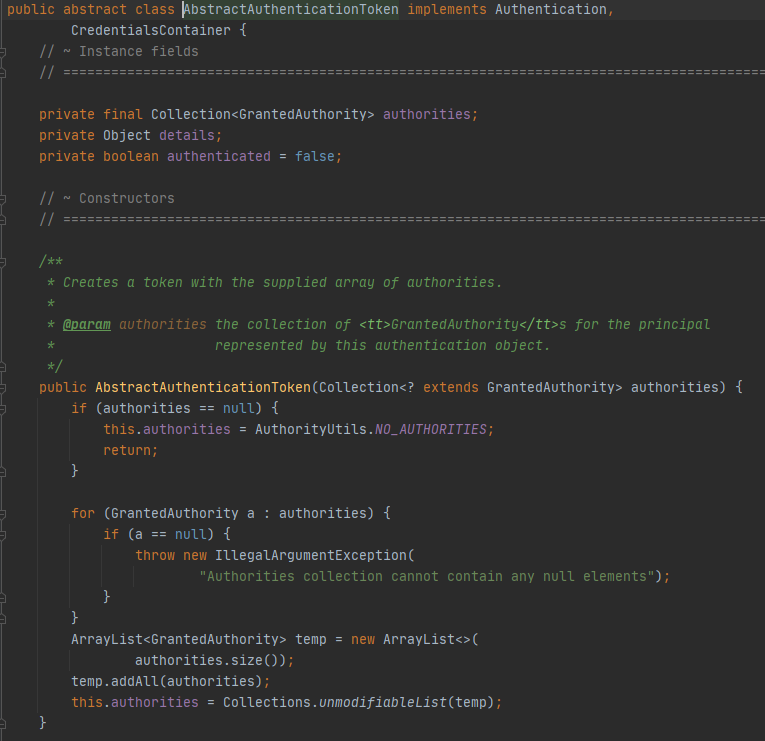
AbstractAuthenticationToken은 Authentication을 상속받는다는 것을 알 수 있다.
즉, UsernamePasswordAuthenticationToken은 추후 인증이 끝나고 SecurityContextHolder.getContext()에 등록될 Authentication 객체이다.
그럼 다시 위의 UsernamePasswordAuthenticationToken의 생성자들을 한번 보자
//UsernamePasswordAuthenticationToken
public UsernamePasswordAuthenticationToken(Object principal, Object credentials) {
	super(null);
	this.principal = principal;
	this.credentials = credentials;
	setAuthenticated(false);
}
public UsernamePasswordAuthenticationToken(Object principal, Object credentials,
		Collection<? extends GrantedAuthority> authorities) {
	super(authorities);
	this.principal = principal;
	this.credentials = credentials;
	super.setAuthenticated(true); // must use super, as we override
}
각 생성자는 setAuthenticated(false), setAuthenticated(true)를 실행한다. 그럼 UsernamePasswordAuthenticationToken객체를 생성하던 위의 UsernamePAsswordAuthenticationFilter의 attemptAuthentication()안의 코드를 다시 보자
UsernamePasswordAuthenticationToken authRequest = new UsernamePasswordAuthenticationToken(
	username, password);
setAuthenticated(false);가 있는 생성자를 호출하는것을 볼 수 있다.
즉, 아직 인증되지 않은 Authentication객체를 생성한 것이고 추후 모든 인증이 완료되면 인증된 생성자로 Authentication객체가 생성된다는 것을 알아두자!
AuthenticationManager
자 이제 두번째 봐야할 this.getAuthenticationManager()를 보자
이 메소드는 UsernamePasswordAuthenticationFilter가 상속한 AbstractAuthenticationProcessingFilter에 있는 AuthenticationManager객체를 가져오는 것이다.
그럼 AuthenticationManager가 무엇일까?
AuthenticationManager는 AuthenticationProvider라는 클래스 객체를 관리한다. AuthenticationProvider는 실제 인증 로직이 담긴 객체라 보면된다.
AuthenticationManager는 Interface로 되어있고 authenticate(Authentication authentication)메소드만 정의되어 있다. 리턴타입은 Authentication으로 되어있는데 이것은 authenticate()를 실행하여 authenticationProvider객체를 통해 인증이 완료되면 인증된 Authentication객체를 반환하는 기능을 한다는 것이다.
public interface AuthenticationManager {

	Authentication authenticate(Authentication authentication)
			throws AuthenticationException;
}
그럼 UsernamePasswordAuthenticationFilter 객체에서 사용하는 AuthenticationManager 구현체는 무엇일까?
ProviderManager라는 클래스이다. 아래는 실제 authenticate() 메소드 구현체의 일부이다.

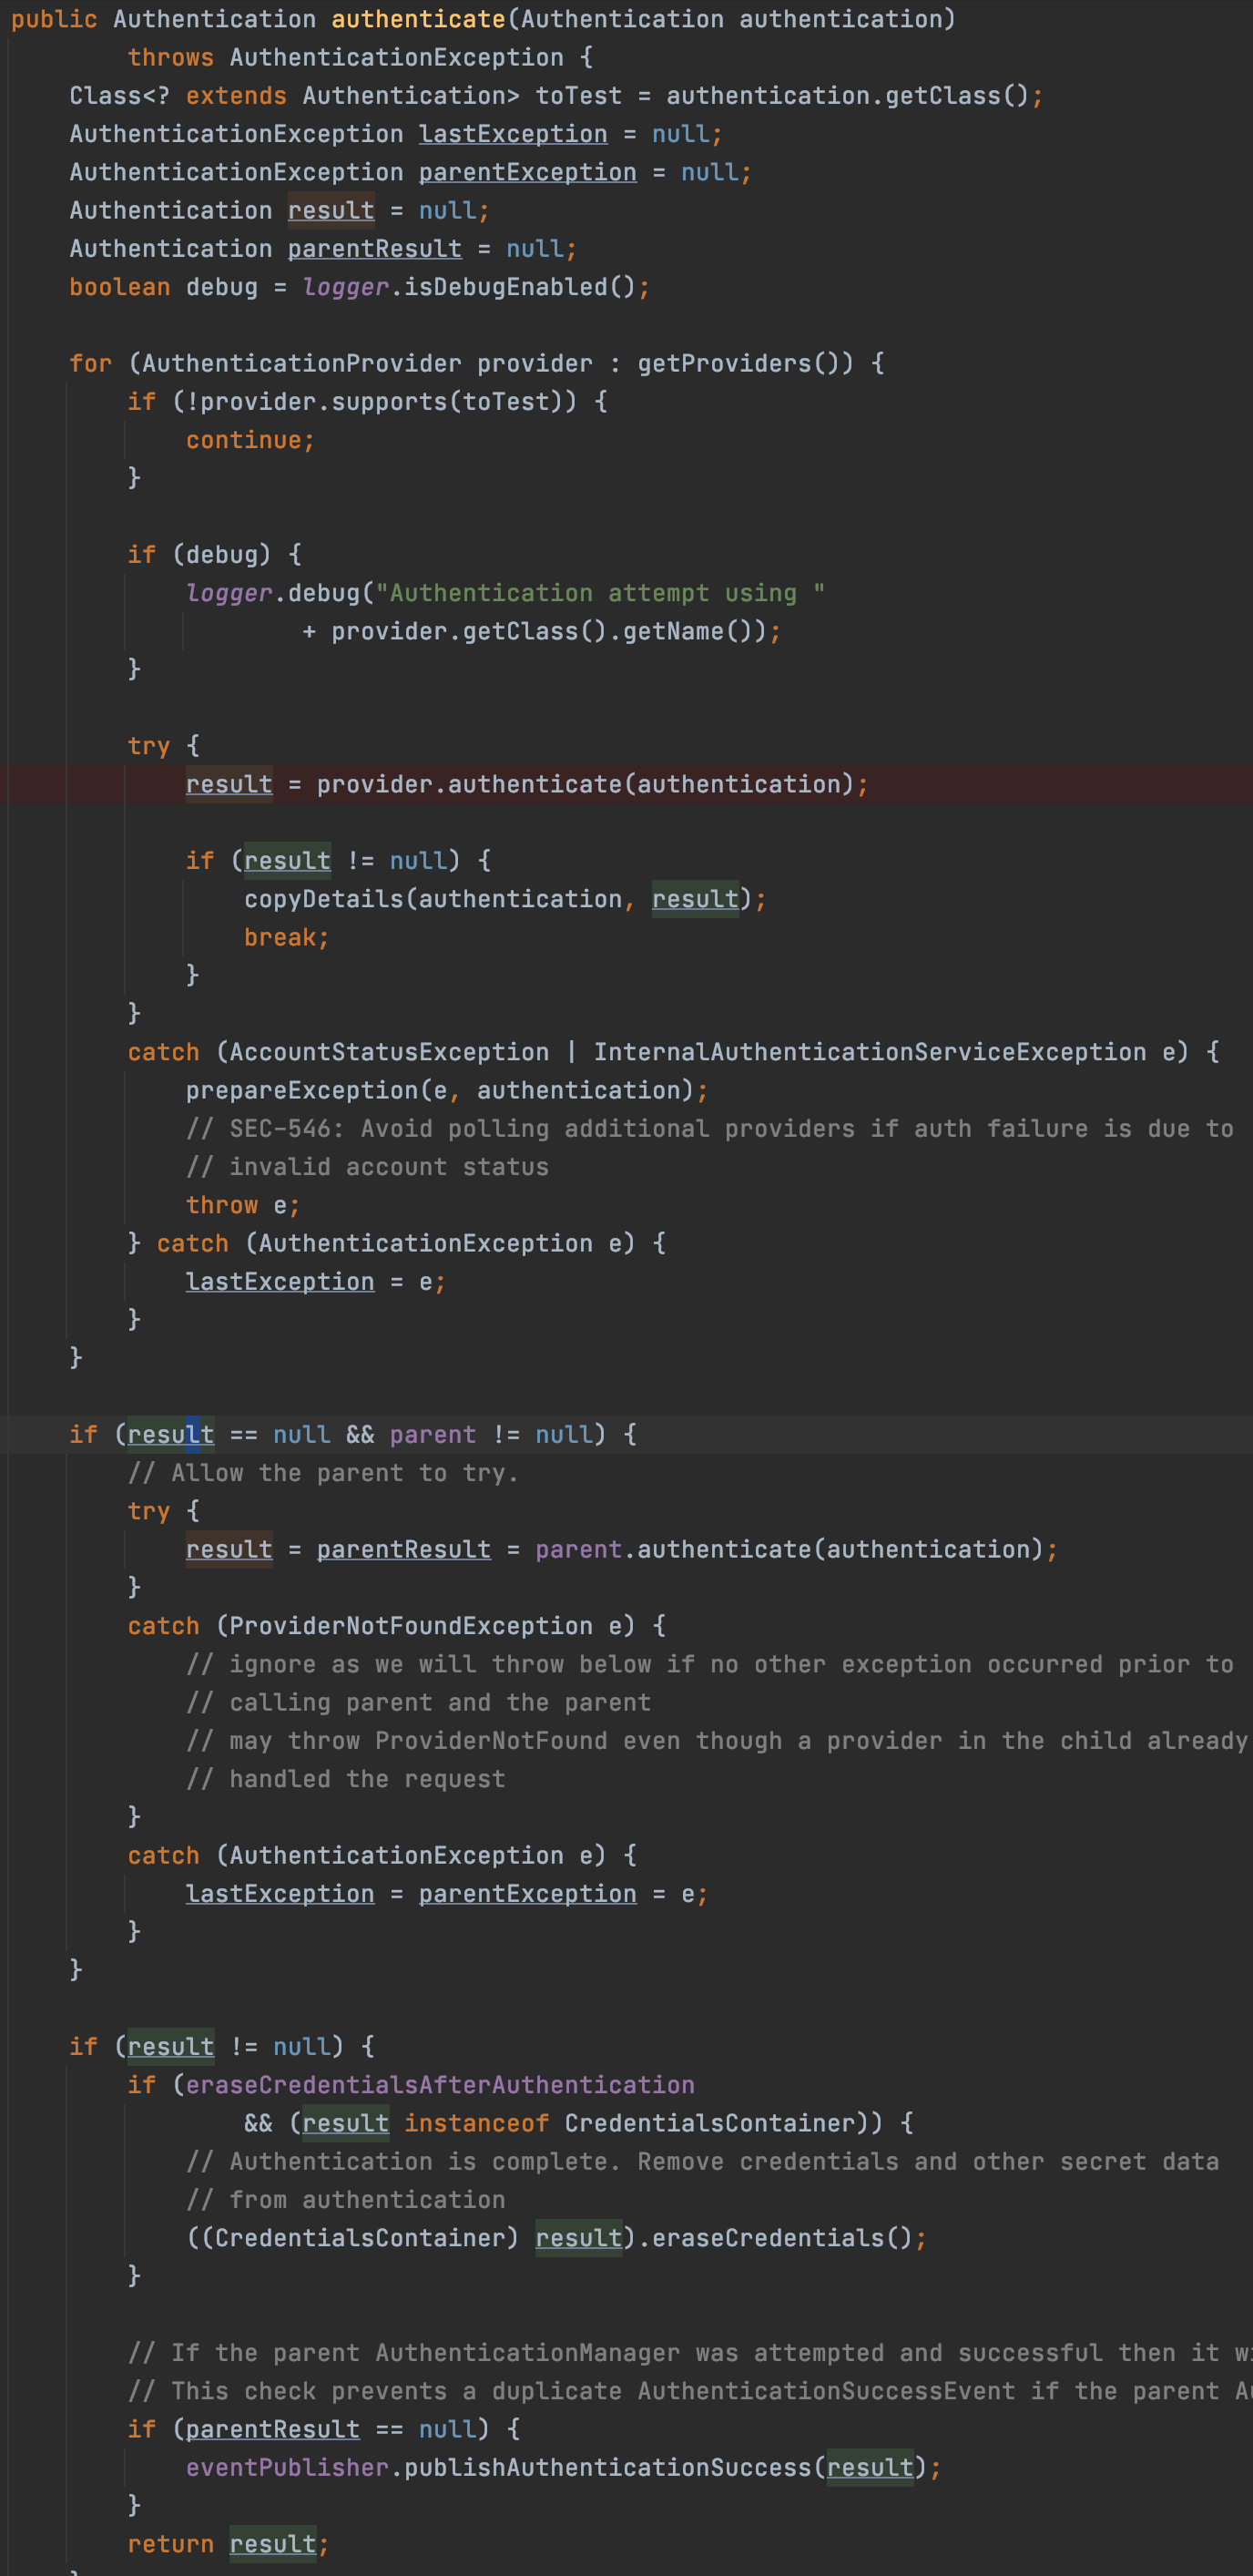
AuthenticationManager는 AuthenticationProvider를 관리한다 말했다. 위 코드를 보면 for문에서 AuthenticationProvider 객체로 루프를 돌리게 되어있다.
그럼 AuthenticationProvider를 보자
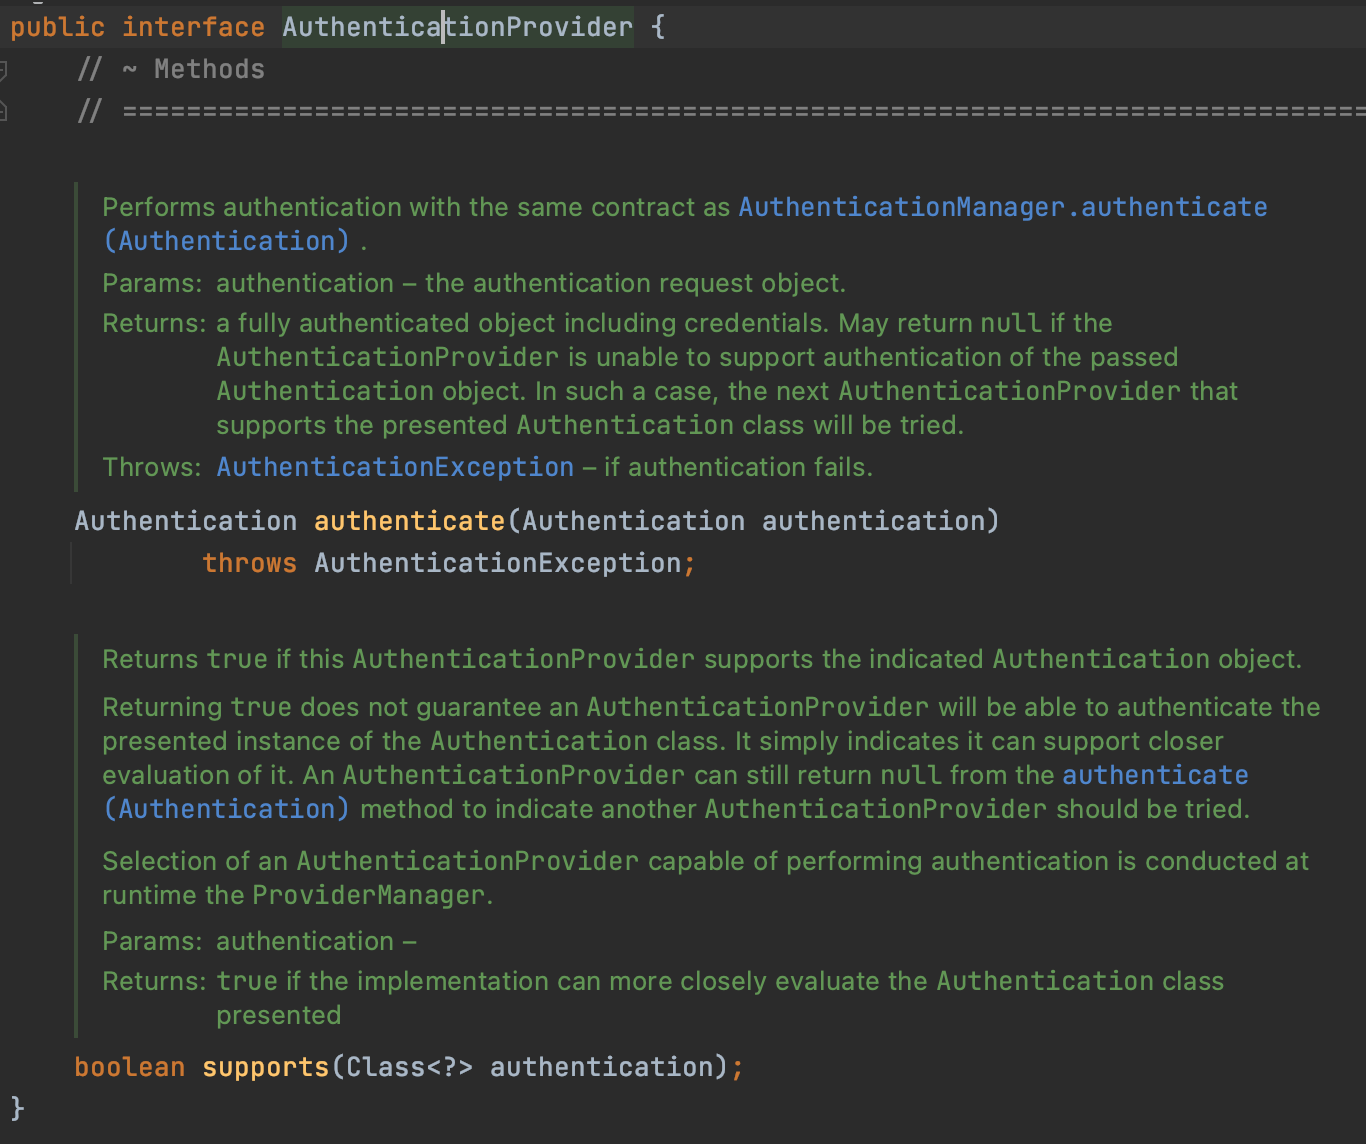
authenticate()는 실제 인증로직이 담길 메소드이고 supports()는 위의ProviderManager의 authenticate()메소드를 보면 if(!provider.supports())가 있는데 이건 매개변수로 받은 Authentication객체의 구현체 클래스가 AuthenticationProvider객체에서 사용하는 Authentication객체와 같은지 확인한다.
즉, AuthenticationProivder 구현체는 인증을 진행할 때 인증 정보를 담은 Authentication객체를 가지고 인증을 진행하는데 이 Authentication 객체는 AuthenticationProvider마다 다르기 때문에 support()를 통해 Authentication객체에 맞는 AuthenticationProvider를 찾는다. 이 과정이 AuthenticationManager 구현체인 ProviderManager에서 이루어진다.
그렇다면 다시 리마인드해서 우리가 사용할 Authentication객체는 무엇인가? 바로 UsernamePasswordAuthenticationToken객체이다.
자 그러면 이제 AuthenticationProvider의 구현체를 봐보자. 기본적으로 설정된 구현체는 AbstractDetailsAuthenticationProvider 클래스이다.

다음은 authenticate() 메소드 구현체이다.
public Authentication authenticate(Authentication authentication)
throws AuthenticationException {
    Assert.isInstanceOf(UsernamePasswordAuthenticationToken.class, authentication,
        () - > messages.getMessage(
            "AbstractUserDetailsAuthenticationProvider.onlySupports",
            "Only UsernamePasswordAuthenticationToken is supported"));

    // Determine username
    String username = (authentication.getPrincipal() == null) ? "NONE_PROVIDED" :
        authentication.getName();

    boolean cacheWasUsed = true;
    UserDetails user = this.userCache.getUserFromCache(username);

    if (user == null) {
        cacheWasUsed = false;

        try {
            user = retrieveUser(username,
                (UsernamePasswordAuthenticationToken) authentication);
        } catch (UsernameNotFoundException notFound) {
            logger.debug("User '" + username + "' not found");

            if (hideUserNotFoundExceptions) {
                throw new BadCredentialsException(messages.getMessage(
                    "AbstractUserDetailsAuthenticationProvider.badCredentials",
                    "Bad credentials"));
            } else {
                throw notFound;
            }
        }

        Assert.notNull(user,
            "retrieveUser returned null - a violation of the interface contract");
    }

    try {
        preAuthenticationChecks.check(user);
        //DB 데이터와 입력 값을 비교하는 메소드
        additionalAuthenticationChecks(user,
            (UsernamePasswordAuthenticationToken) authentication);
    } catch (AuthenticationException exception) {
        if (cacheWasUsed) {
            // There was a problem, so try again after checking
            // we're using latest data (i.e. not from the cache)
            cacheWasUsed = false;
            user = retrieveUser(username,
                (UsernamePasswordAuthenticationToken) authentication);
            preAuthenticationChecks.check(user);
            additionalAuthenticationChecks(user,
                (UsernamePasswordAuthenticationToken) authentication);
        } else {
            throw exception;
        }
    }

    postAuthenticationChecks.check(user);

    if (!cacheWasUsed) {
        this.userCache.putUserInCache(user);
    }

    Object principalToReturn = user;

    if (forcePrincipalAsString) {
        principalToReturn = user.getUsername();
    }
	//인증된 Authentication 객체를 만든다.
    return createSuccessAuthentication(principalToReturn, authentication, user);
}
여기서 봐야할 부분은 user = retrieveUser(username,(UsernamePasswordAuthenticationToken) authentication); 이다.
username(유저 id)와 Authentication객체를 가지고 UserDetails객체를 가져온다. retrieveUser()는 추상 메소드로 되어있다.

AbstractUserDetailsAuthenticationProvider를 상속받은 또 다른 클래스가 있다는 것을 알 수 있다. 그 클래스는 DaoAuthenticationProvider클래스이다.

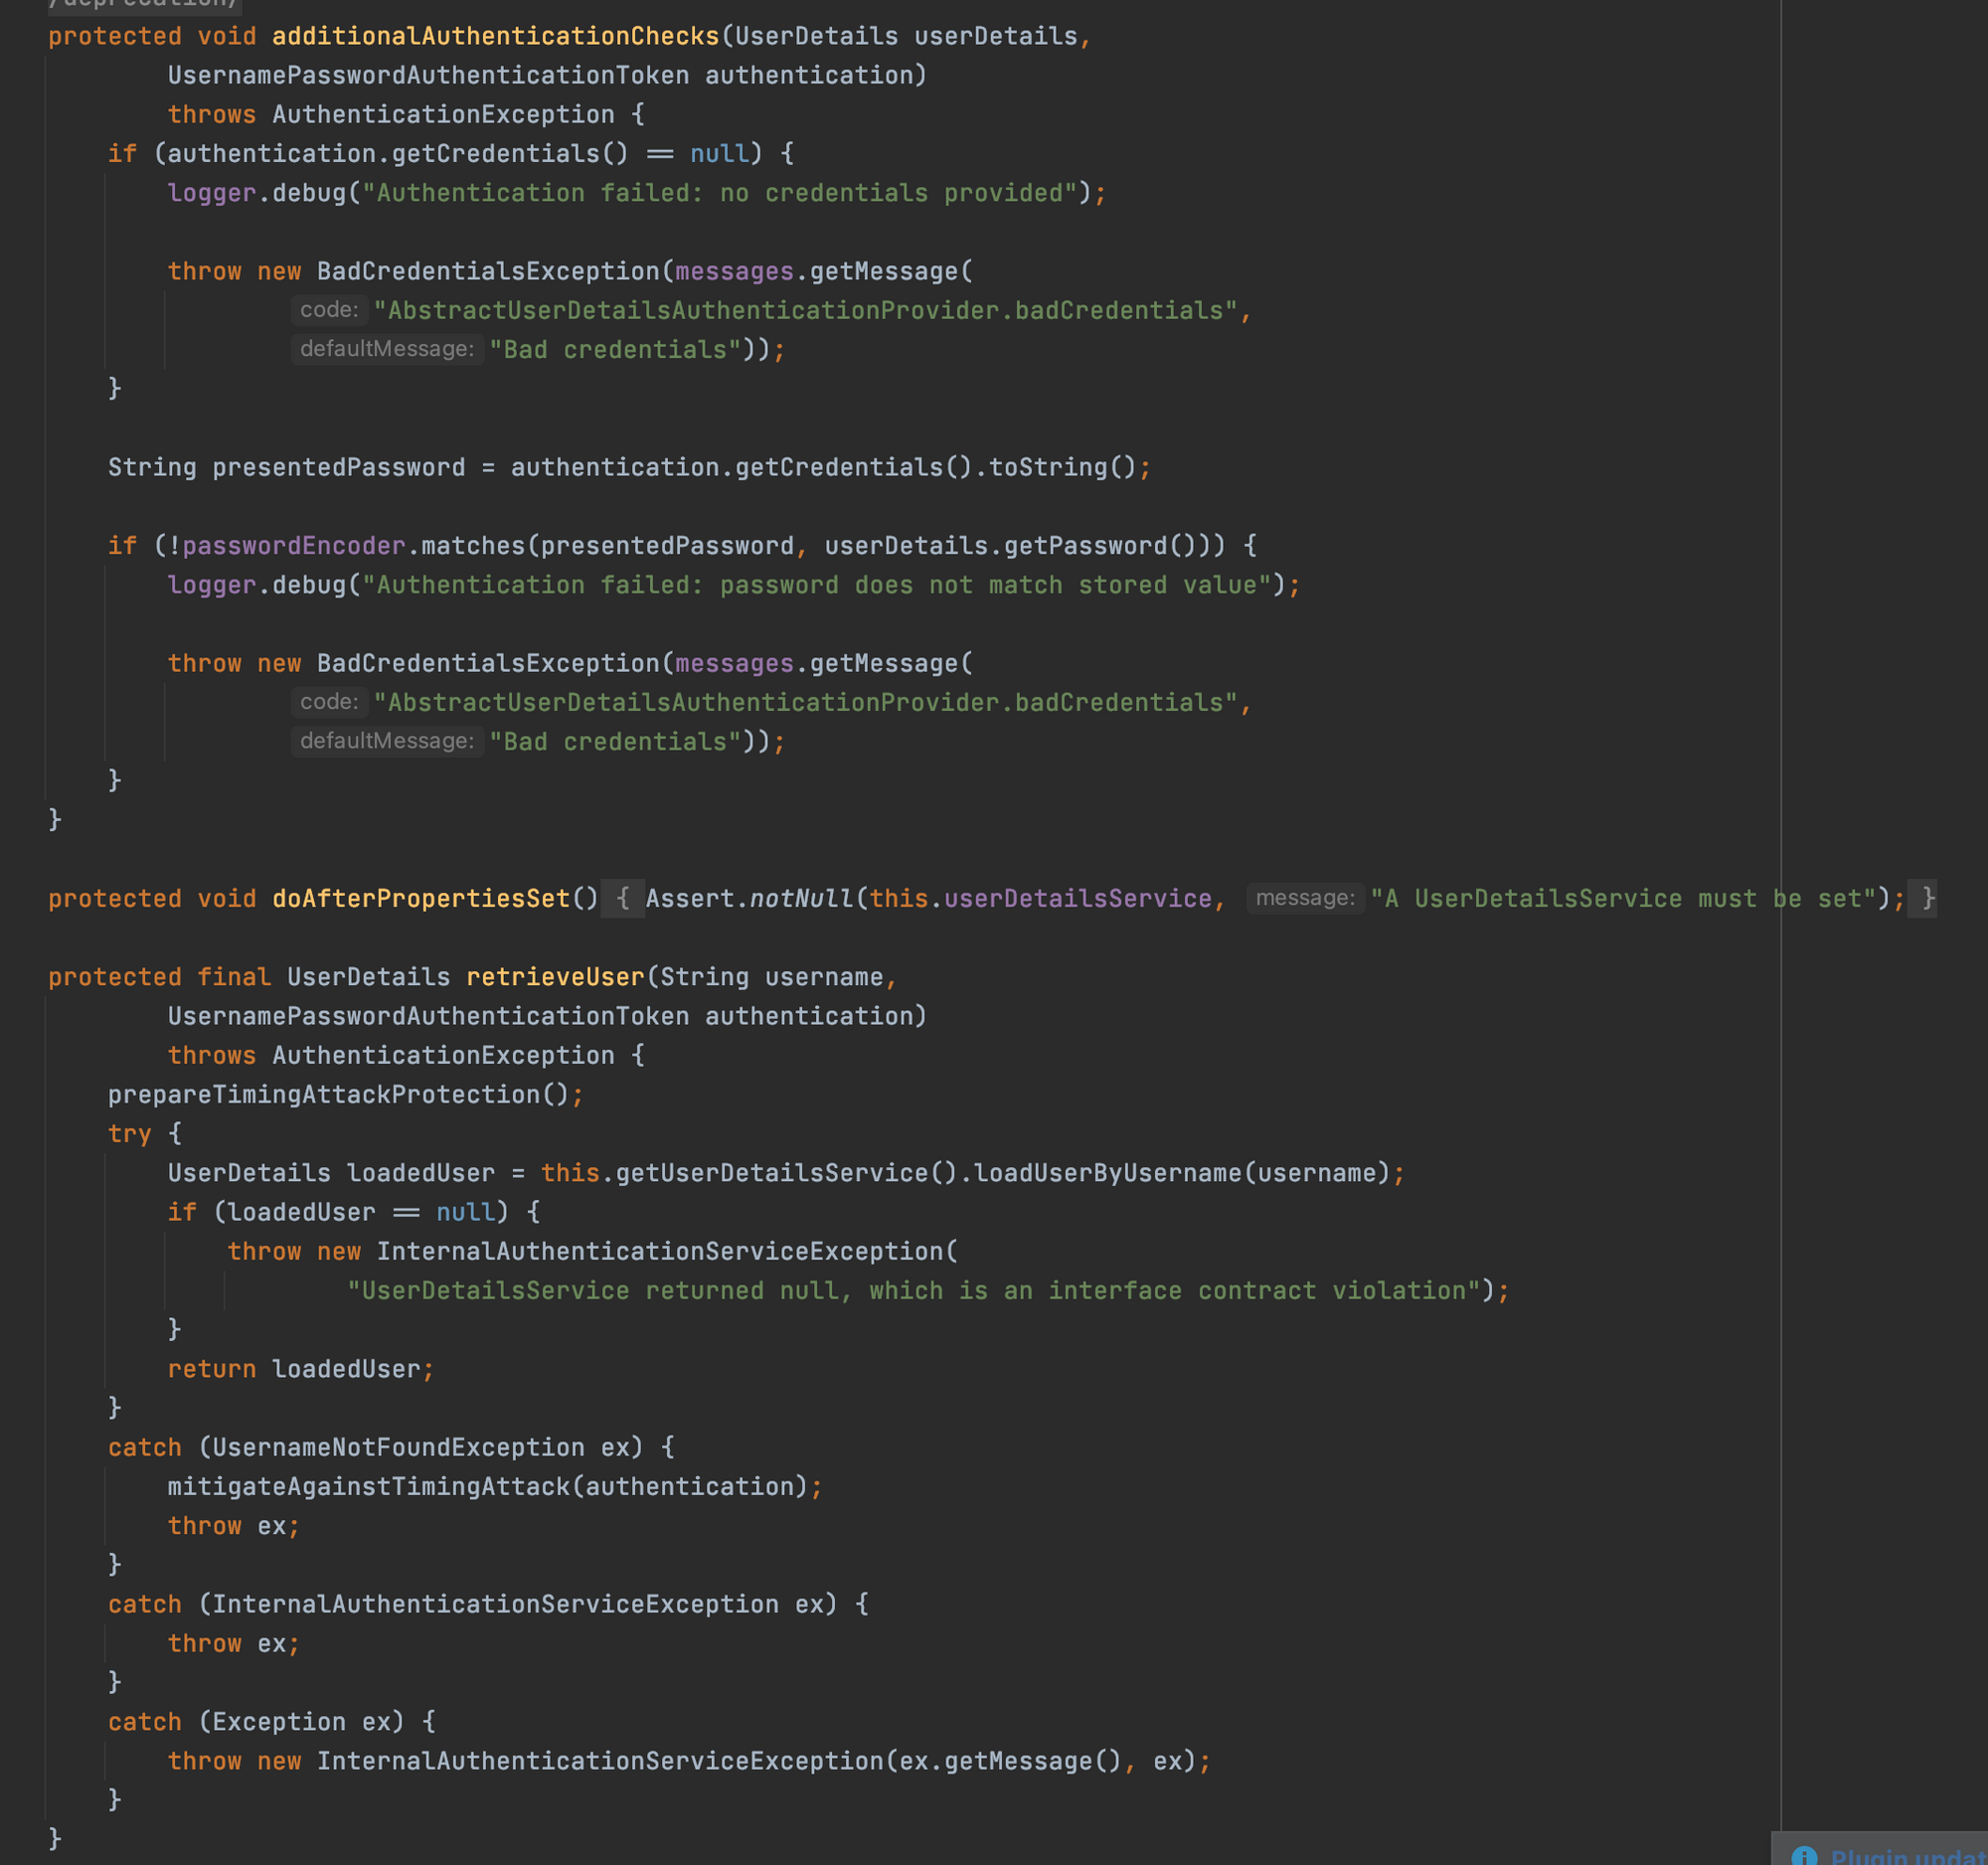
DaoAuthenticationProvider에서 재정의된 메소드중 봐야할 것이 additionalAuthenticationChecks()와 retrieveUser()이다.
먼저 retrieveUser()는 UserDetailsService객체를 통해 로그인 요청한 유저의 UserDetails 객체를 가져온다
additionalAuthenticationChecks()메소드는 입력받은 정보(username, credetial)와 userDetails객체의 정보와 비교해 인증을 체크하는 메소드이다. 실질적으로 DB의 데이터와 id, 비밀번호를 입력한 값과 비교하는 곳이라 할 수 있다.
자 이제 위의 메소드를 이용해서 사용자 id와 비밀번호가 맞다는 것을 판별하면 AbstractDetailsAuthenticationProvider의 authenticate()의 마지막 부분에 createSuccessAuthentication(principalToReturn, authentication, user)가 반환된다.
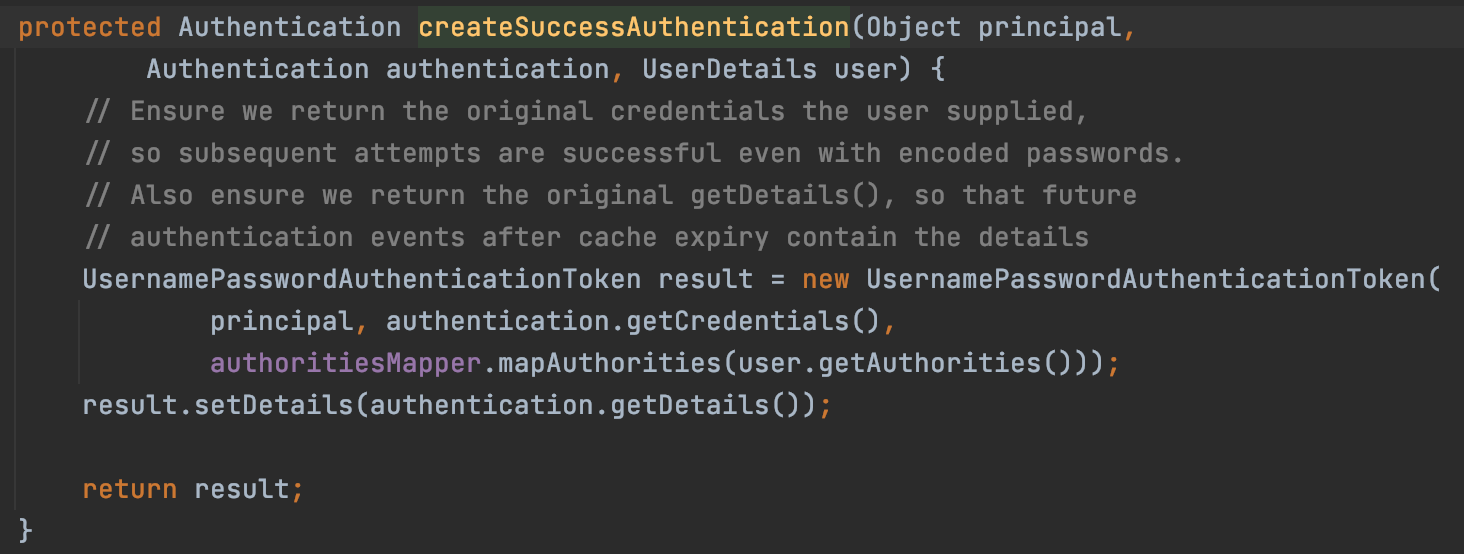
위 코드를 보면 UsernamePasswordAuthenticationToken객체를 만드는걸 볼 수 있다. 여기서 위에서 봤던걸 다시 기억하자
UsernamePasswordAuthenticationToken은 Authentication을 상속받은 클래스이다. 또 생성자가 2개가 있었다.
public UsernamePasswordAuthenticationToken(Object principal, Object credentials) {
	super(null);
	this.principal = principal;
	this.credentials = credentials;
	setAuthenticated(false);
}

public UsernamePasswordAuthenticationToken(Object principal, Object credentials,
		Collection<? extends GrantedAuthority> authorities) {
	super(authorities);
	this.principal = principal;
	this.credentials = credentials;
	super.setAuthenticated(true); // must use super, as we override
}
이제 드디어 인증이 된 Authentication객체를 만드는 것이다. 그리고 이 객체는 지금까지 타고타고 왔던 메소드를 끝내고 맨처음UsernamePasswordAuthenticationFilter의 attmpetAuthentication()에서 반환이 된다.
attemptAuthentication()은 UsernamePasswordAuthenticationFilter가 상속한 AbstractAuthenticationProcessingFilter 객체의 doFilter()에서 실행된 것이었다.

위 코드에서 authResult에 인증받은 Authentication객체가 저장되고 successfulAuthentication()메소드가 실행된다.
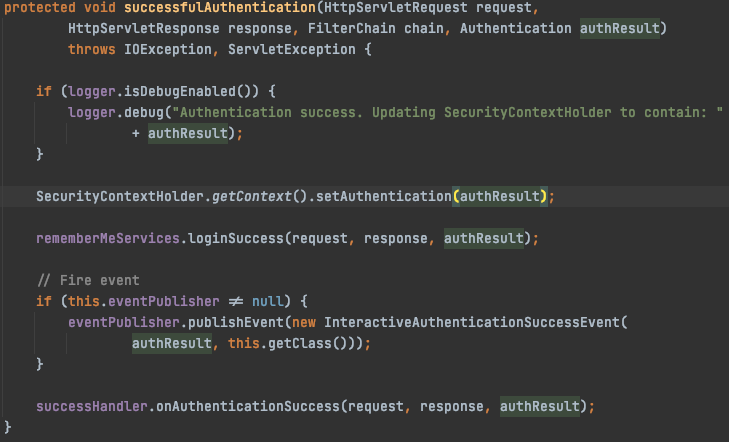
successfultAuthentication()에서는 드디어 우리가 인증받은 Authentication객체를 Security Context에 저장하는 코드가 들어있다. 이렇게 인증 프로세스가 마무리 된다.
지금까지 얘기했던 프로세스와 클래스를 그림으로 나타내면 다음과 같다.
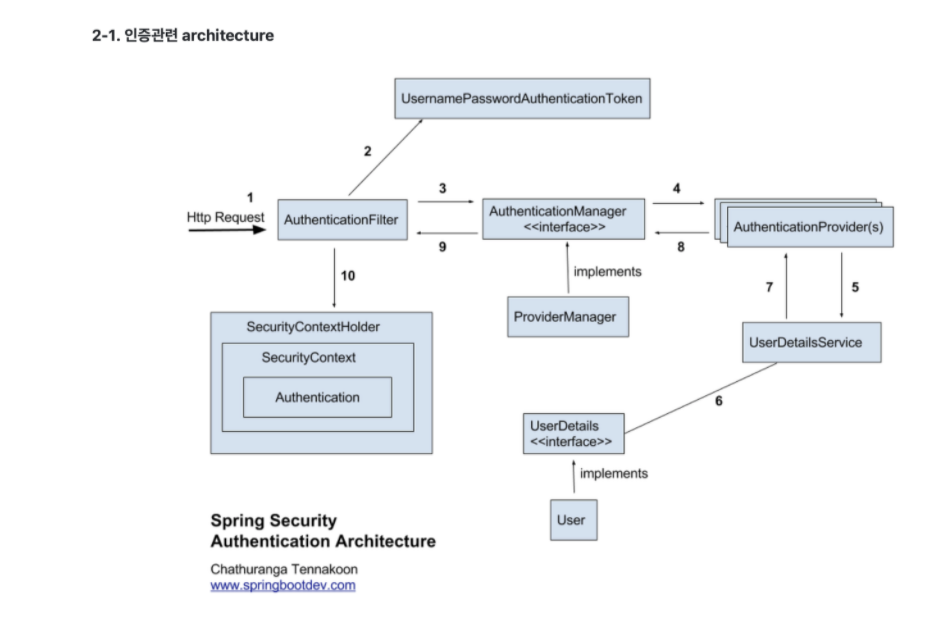
여러 클래스를 왔다갔다하면서 설명하느라 나도 쓰면서 헷갈리는 부분이 있었다. 위의 그림을 보고 다시한번 보면 이해가 좀 더 잘될 것이라 생각한다.
다음 포스팅에서는 이 지식을 기반으로 Custom 인증을 어떻게 구현하는지 알아보도록 하자.
'스프링' 카테고리의 다른 글
| [JPA] 3. 엔티티 연관 관계 매핑 정리/예제 (7) | 2021.02.28 |
|---|---|
| [JPA] 2. 엔티티 매핑 @어노테이션 정리/예제 (1) | 2021.02.16 |
| [SpringBoot] thymeleaf + Mybatis + PageHelper 페이징 간단예제 (0) | 2020.10.31 |
| [SpringBoot] spring-security 회원가입/로그인/권한 예제 (2) | 2020.10.02 |
| [JPA] 1. 영속성 컨텍스트(Persistence Context) 정리 (0) | 2020.08.17 |


