
| 일 | 월 | 화 | 수 | 목 | 금 | 토 |
|---|---|---|---|---|---|---|
| 1 | 2 | 3 | 4 | 5 | ||
| 6 | 7 | 8 | 9 | 10 | 11 | 12 |
| 13 | 14 | 15 | 16 | 17 | 18 | 19 |
| 20 | 21 | 22 | 23 | 24 | 25 | 26 |
| 27 | 28 | 29 | 30 |
- spring security
- bean
- JPA 비관적락
- component
- JPA Lock
- 서버개발캠프
- JPA
- 디자인 패턴
- 스마일게이트
- Transaction isolation level
- JPA 낙관적락
- 캠프
- 암호화
- 안드로이드
- Inno DB
- JPA 동시성
- spring
- annotation
- 스프링 log
- 개발
- Pessimistic Lock
- spring security 인증
- 낙관적락 비관적락 차이
- Android
- Optimistic Lock
- Redis
- 스프링 로그
- flask
- 서버
- 스프링
- Today
- Total
모르는게 많은 개발자
[Vue] Vuex 간단 설명/예제 본문
Vue 프로젝트를 하다보면 vuex라는 것을 당연히 사용하게 되는데 vuex가 무엇인지 정리하고자 이 글을 쓴다.
1. Vuex
vue를 사용하면 부모 컴포넌트의 데이터를 자식 컴포넌트로 보내야할 일이 많다. 그럼 일반적인 방법으로는 props 기능을 이용해 아래처럼 데이터를 보내게 된다.
<!-- App.vue -->
<template>
  <div id="app">
    <!-- test1라는 이름으로 msg 데이터를 Test1컴포넌트로 보냄 -->
    <Test1 :test1="msg"/>
  </div>
</template>

<script>
import Test1 from "./components/Test1";
export default {
  name: 'app',
  components: {Test1},
  data () {
    return {
      msg: 'Welcome to Your Vue.js App'
    }
  }
}
</script>
<!-- Test1.vue -->
<template>
<div>
{{test1}}
</div>
</template>
<script>
export default {
name: "Test1",
components: {Test11},
//부모 컴포넌트(App.vue)에서 보냄 test1데이터를 받음
props: ['test1']
}
</script>그렇다면 만약 아래처럼 또 부모의 자식의 자식 컴포넌트로 보내려면 또 props를 이용해서 보내줘야 한다.
<!-- Test1.vue -->
<template>
  <div>
    {{test1}}
    <Test11 :t11="test1"/>
  </div>
</template>

<script>
import Test11 from "./Test11";
export default {
  name: "Test1",
  components: {Test11},
  props: ['test1']
}
</script>
결과적으로 이러한 과정을 거치고 프로젝트가 커진다면 코드가 복잡해지고 유지보수가 어렵게 만들 수 있다.
그래서 존재하는 것이 Vuex이다.
Vuex는 모든 컴포넌트가 공유할 수 있는 싱글톤 방식의 데이터 저장소이다. 즉, 단일 객체에 변수를 선언하고 모든 컴포넌트에서 사용할 수 있는 방식이다.
Vuex에는 4가지 속성이 있고, 각 역할은 다음과 같다.
- state: 변수들의 집합
- gettes: state의 변수들을 get하는역할을 한다.(사용 안해도 무방)
- mutations: 변수들을 조작하는 함수들의 집합
- actions: 비동기 처리를 하는 함수들의 집합
그리고 Vue에서 의도한 각 속성들의 사이클은 다음과 같다.

위 사진처럼 Vuex에서는 component가 actions를 통해 비동기 작업(서버에서 데이터를 가져오는 작업 등)을 호출하고 mutations을 호출해 state의 변수들을 조작해주고 이것이 component에 적용되게 하는 과정을 의도한다.
정리하면 Component -> 비동기 호출(Actions) -> 데이터 조작(Mutations) -> 데이터 저장(State)
2. 사용 예제
먼저 Vue기본 프로젝트에서 store디렉토리안에 index.js 파일을 하나 만들자 (store 디렉토리에 만드는 것이 일반적)
다음으로 아래처럼 index.js에 Vuex Store를 만들고 안에 state, mutations, actions, gtetters를 선언한다. 그리고 state안에는 test라는 변수를 선언한자
//index.js
import Vuex from 'vuex'
import Vue from 'vue'

Vue.use(Vuex);

export default new Vuex.Store({
  state:{
    test: 'test'
  },
  mutations: {},
  actions: {},
  getters: {}
})
Vuex를 사용하려면 프로젝트의 main.js에 아래처럼 store를 넣어줘야한다.
//main.js
import Vue from 'vue'
import App from './App.vue'
import store from "./store";
new Vue({
  el: '#app',
  store,
  render: h => h(App)
})
State
이제 state의 변수를 출력해보자. 아래 처럼 this.$store.state를 통해 변수에 접근가능하다.
<!-- App.vue -->
<template>
  <div id="app">
    {{this.$store.state.test}}
  </div>
</template>

<script>
export default {
  name: 'app'
}
</script>
Mutations
다음은 mutations를 이용해 test값을 바꿔보자
mutations에 test값을 변경하는 함수를 작성하고, component에서는 버튼 클릭시 mutations을 호출 하도록 했다.
//index.js
import Vuex from 'vuex'
import Vue from 'vue'

Vue.use(Vuex);

export default new Vuex.Store({
  state:{
    test: 'test'
  },
  mutations: {
    SET_TEST(state, value) {
      state.test = value;
    }
  },
  actions: {},
  getters: {}
})
<!-- App.vue -->
<template>
<div id="app">
<!-- click 하면 setTest 호출 -->
<button @click="setTest">click</button>
{{this.$store.state.test}}
</div>
</template>
<script>
export default {
name: 'app',
methods: {
setTest() {
//mutations SET_TEST 호출
this.$store.commit('SET_TEST', 'test2');
}
}
}
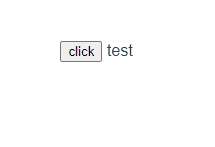
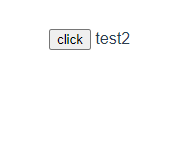
</script>App.vue에서 mutations의 함수를 호출할 때 commit을 사용한다.
결과는 click 버튼을 누르게 되면 test가 test2로 변경된다.
actions
이번엔 actions에 setTimeout 비동기 함수를 호출하여 1초후 test의 값을 변경하는 작업을 해보자
아래와 같이 actions에 비동기 함수를 작성하고, 콜백함수로 mutations의 SET_TEST를 등록한다.
//index.js
import Vuex from 'vuex'
import Vue from 'vue'

Vue.use(Vuex);

export default new Vuex.Store({
  state:{
    test: 'test'
  },
  mutations: {
    SET_TEST(state, value) {
      state.test = value;
    }
  },
  actions: {
    //비동기 호출
    TIME({commit}, value) {
      return setTimeout(() => {
        commit('SET_TEST', value);
      }, 1000);
    }
  },
  getters: {}
})
<!-- App.vue -->
<template>
<div id="app">
<!-- click 하면 setTest 호출 -->
<button @click="setTest">click</button>
<!-- 2초뒤 test값 변경 -->
{{this.$store.state.test}}
</div>
</template>
<script>
export default {
name: 'app',
methods: {
setTest() {
//actions TIME 호출
this.$store.dispatch('TIME', 'test2');
}
}
}
</script>mutations은 commit을 이용해 호출할 수 있지만 actions는 dispatch를 통해 호출 가능하다.
결과는 버튼을 클릭하면 2초뒤 test2로 값이 변경된다.
3. map helper
위의 예제들에서 state, mutations, actions를 써봤을 때 공통점은 호출할 때 this.$store를 사용한다는 것이다. Vuex를 좀 더 깔끔하게 사용할 방법이 뭐가 있을까? map helper라는 것이 있다. 이것을 사용함으로써 좀 더 깔끔하게 Vuex를 사용할 수 있다.
아래 예제는 state와 commit으로 mutation을 호출하고, dispastch로 actions을 호출하는 예제입니다.
<!-- App.vue -->
<template>
  <div id="app">
    <button @click="setDispatchTest">dispatch</button>
    <button @click="setCommitTest">commit</button>

    {{this.$store.state.test1}}
    {{this.$store.state.test2}}
  </div>
</template>

<script>
export default {
  name: 'app',
  methods: {
    setDispatchTest() {
      //actions TIME 호출
      this.$store.dispatch('TIME', 'test1');
    },
    setCommitTest() {
      this.$store.commit('SET_TEST2', 'test2');
    }
  }
}
</script>
//index.js
import Vuex from 'vuex'
import Vue from 'vue'
Vue.use(Vuex);
export default new Vuex.Store({
state:{
test1: '',
test2: ''
},
mutations: {
SET_TEST1(state, value) {
state.test1 = value;
},
SET_TEST2(state, value) {
state.test2 = value;
}
},
actions: {
//비동기 호출
TIME({commit}, value) {
return setTimeout(() => {
commit('SET_TEST1', value);
}, 1000);
}
},
getters: {}
})이제 이것을 map helper를 사용하면 App.vue를 아래와 같이 바꿀 수 있다.
<!-- App.vue -->
<template>
  <div id="app">
    <!-- click 하면 setTest 호출 -->
    <button @click="setDispatchTest">dispatch</button>
    <button @click="setCommitTest">commit</button>
    <!-- state값을 바로 사용할 수 있다 -->
    {{test1}}
    {{test2}}
  </div>
</template>

<script>
//사용할 map helper를 import해준다
import {mapState, mapActions, mapMutations} from 'vuex';

export default {
  name: 'app',
  computed: {
    //사용할 state값을 넣어준다. state는 computed에 넣는 것을 권장
    ...mapState(['test1', 'test2'])
  },
  methods: {
    //사용할 action과 mutation을 선언
    ...mapActions(['TIME']),
    ...mapMutations(['SET_TEST2']),
    setDispatchTest() {
      //action 사용
      this.TIME('test1');
      //this.$store.dispatch('TIME', 'test1');
    },
    setCommitTest() {
      //mutation 사용
      this.SET_TEST2('test2');
      //this.$store.commit('SET_TEST2', 'test2');
    }
  }
}
</script>
각 속성마다 map helper를 사용해 등록한다.
- state -> mapState : mapState는 computed에 넣는 것을 권장
- actions -> mapActions : method에 넣음
- mutations -> mapMutations : method에 넣음
- getters -> mapGetters : computed에 넣는 것을 권장
'Vue' 카테고리의 다른 글
| [Vue] Nginx에 Vue 프로젝트 올리기 간단 정리 (0) | 2020.11.17 |
|---|---|
| [Javascript] Prototype 간단 정리 (0) | 2020.11.17 |
| [Vue] Vue.js 기본 문법 총정리 (1) | 2020.08.23 |


